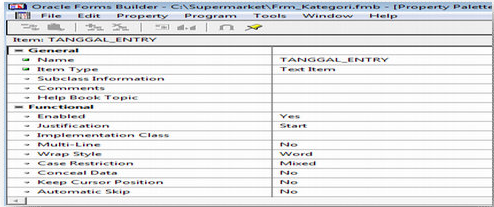
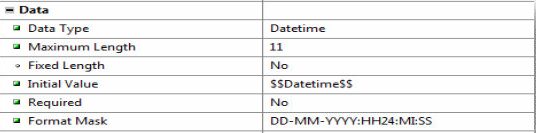
1. Componen yang dibutuhkan
2. Write File Excel
// Java Program to Illustrate Writing
// Data to Excel File using Apache POI
// Import statements
import java.io.FileOutputStream;
import java.io.IOException;
import org.apache.poi.ss.usermodel.Cell;
import org.apache.poi.ss.usermodel.Row;
import org.apache.poi.xssf.usermodel.XSSFSheet;
import org.apache.poi.xssf.usermodel.XSSFWorkbook;
// Main class
public class GFG {
// Main driver method
public static void main(String[] args)
{
// Blank workbook
XSSFWorkbook workbook = new XSSFWorkbook();
// Creating a blank Excel sheet
XSSFSheet sheet
= workbook.createSheet("student Details");
// Creating an empty TreeMap of string and Object][]
// type
Map<String, Object[]> data
= new TreeMap<String, Object[]>();
// Writing data to Object[]
// using put() method
data.put("1",
new Object[] { "ID", "NAME", "LASTNAME" });
data.put("2",
new Object[] { 1, "Pankaj", "Kumar" });
data.put("3",
new Object[] { 2, "Prakashni", "Yadav" });
data.put("4", new Object[] { 3, "Ayan", "Mondal" });
data.put("5", new Object[] { 4, "Virat", "kohli" });
// Iterating over data and writing it to sheet
Set<String> keyset = data.keySet();
int rownum = 0;
for (String key : keyset) {
// Creating a new row in the sheet
Row row = sheet.createRow(rownum++);
Object[] objArr = data.get(key);
int cellnum = 0;
for (Object obj : objArr) {
// This line creates a cell in the next
// column of that row
Cell cell = row.createCell(cellnum++);
if (obj instanceof String)
cell.setCellValue((String)obj);
else if (obj instanceof Integer)
cell.setCellValue((Integer)obj);
}
}
// Try block to check for exceptions
try {
// Writing the workbook
FileOutputStream out = new FileOutputStream(
new File("gfgcontribute.xlsx"));
workbook.write(out);
// Closing file output connections
out.close();
// Console message for successful execution of
// program
System.out.println(
"gfgcontribute.xlsx written successfully on disk.");
}
// Catch block to handle exceptions
catch (Exception e) {
// Display exceptions along with line number
// using printStackTrace() method
e.printStackTrace();
}
}
}
3. Read File Excel
// Java Program to Illustrate Reading
// Data to Excel File Using Apache POI
// Import statements
import java.io.File;
import java.io.FileInputStream;
import java.io.IOException;
import org.apache.poi.hssf.usermodel.HSSFSheet;
import org.apache.poi.hssf.usermodel.HSSFWorkbook;
import org.apache.poi.ss.usermodel.Cell;
import org.apache.poi.ss.usermodel.FormulaEvaluator;
import org.apache.poi.ss.usermodel.Row;
// Main class
public class GFG {
// Main driver method
public static void main(String[] args)
{
// Try block to check for exceptions
try {
// Reading file from local directory
FileInputStream file = new FileInputStream(
new File("gfgcontribute.xlsx"));
// Create Workbook instance holding reference to
// .xlsx file
XSSFWorkbook workbook = new XSSFWorkbook(file);
// Get first/desired sheet from the workbook
XSSFSheet sheet = workbook.getSheetAt(0);
// Iterate through each rows one by one
Iterator<Row> rowIterator = sheet.iterator();
// Till there is an element condition holds true
while (rowIterator.hasNext()) {
Row row = rowIterator.next();
// For each row, iterate through all the
// columns
Iterator<Cell> cellIterator
= row.cellIterator();
while (cellIterator.hasNext()) {
Cell cell = cellIterator.next();
// Checking the cell type and format
// accordingly
switch (cell.getCellType()) {
// Case 1
case Cell.CELL_TYPE_NUMERIC:
System.out.print(
cell.getNumericCellValue()
+ "t");
break;
// Case 2
case Cell.CELL_TYPE_STRING:
System.out.print(
cell.getStringCellValue()
+ "t");
break;
}
}
System.out.println("");
}
// Closing file output streams
file.close();
}
// Catch block to handle exceptions
catch (Exception e) {
// Display the exception along with line number
// using printStackTrace() method
e.printStackTrace();
}
}
}
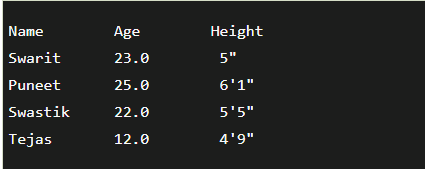
Output :